• You are viewing the forum as a Guest, please login (you can use your Facebook, Twitter, Google or Microsoft account to login) or register using this link: Log in or Sign Up

Transparent Tank - the end

Here it is a month later. Moss has really grown in a lot, and rotala stems have just been trimmed back - was a veritable forest before. Now expecting the stems to burgeon forth in proper thick clumps. Have replaced the filter covers with metal shrimp guards - much easier to slip on and off and clean.
2013-02-14%20at%2021-31-48.jpg

Puffers are great, though definitely a challenge with moss: they're such messy eaters the tank gets pretty cruddy quickly. This tank seems to need a couple of ml of easycarbo a day to keep the algae at bay - think almost certainly due to bits of food getting everywhere and no shrimp to clean up.

Almost tempted to get a hydor to up the flow a bit if they didn't look so awful. But overall this tank now needs practically no effort and looks cheery - my big tank is the one I'm trying to get up to proper aquascaping standards...
 
Am going to try something slightly "brave" next... This set up (see really early on) has the filters a long way - maybe 10 ft - away from the tank, as it's the only way I could make it work originally. And it's really hard to get decent flow, which is proving a problem with the puffers being so messy....

But if I drill through the bottom, I can have the filters directly underneath.! So am at some point going to attempt to drill the bottom of the tank. Will take me quite a while to assemble the parts and the willpower / gumption.

Here's the best guide I can find: Tank Build - From The Very Beginning - Page 11 - Practical Fishkeeping Forum

Any tips?
 
In advance of the big drill, have been working out the new puffer-orientated hardscape. Will admit to being very inspired by George's latest TMC signature journal with manzanita curling over and around petrified wood. I've never done a wood/stone combination and so have had a play with various bits of redmoor and purple schist stone lying around.
2013-02-28%20at%2015-28-05.jpg

And after about half an hour and sawing bits and pieces - which I never realised before is completely crucial to getting a decent layout and twisting around rocks - and ordering some aquarium sealant on my phone to expand my range of options, came up with this (the photo is cropped to the size of the tank):
2013-02-28%20at%2015-28-19.jpg

Was pretty pleased with myself as a starter for ten: the rock looks substantial but is actually very thin, which is important as this tank is only 270mm wide, so was thinking it would actually work from both sides without being a nightmare to clean (i.e. you can get to the edge with a scraper...) Colours come out much more vividly underwater too, and that's a good piece of purple schist and thought could accent with other similar stones if needed in the final layout. And was thinking would clearly be sloped pretty steeply from high up on the right to low on the left...

... so was feeling pretty happy with myself and went to have a cup of tea. Then a horrible thought struck me, and I went inside to have a proper look at George's original hardscape from weeks ago - and realised I'd basically just copied it from memory :eek: 
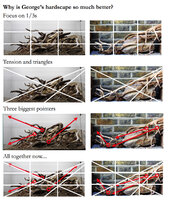
But not as well, obviously. Don't know whether to feel pleased at my memory for a 'scape or embarrassed at my almost flagrant, slightly crap plagiarism. Does show how a good scape sticks in the mind though.
8393791667_d391a3a413_o.jpg


Then I thought it's interesting to compare George's scape with my quick attempt in a slightly more formal way using 1/3s and triangles. This is a big file (sorry, but thought worth it), so please click at will to enlarge. Really shows why George's works and is better in almost every way. (Though please take into account mine is just a quick play about).
Hardscape%20comparison.003.jpg

Embarrassment over and lesson learned! So will stick with some (less derivative!) version of this though. The twistiness of the redmoor roots should provide more interest for the puffers than my current iwagumi-esque set up, as well as giving real potential for some short depth of field shots. Here's a couple of random ones to show what I mean.
2013-02-28%20at%2015-29-46.jpg

2013-02-28%20at%2015-30-05.jpg
2013-02-28%20at%2015-30-27.jpg
 

Attachments

  • Hardscape%20comparison.003.jpg
    Hardscape%20comparison.003.jpg
    2.4 MB · Views: 130
  • Hardscape%20comparison.003.jpg
    Hardscape%20comparison.003.jpg
    2.4 MB · Views: 123
  • 2013-02-28%20at%2015-29-46.jpg
    2013-02-28%20at%2015-29-46.jpg
    137.3 KB · Views: 114
  • 2013-02-28%20at%2015-30-05.jpg
    2013-02-28%20at%2015-30-05.jpg
    141.7 KB · Views: 116
  • 2013-02-28%20at%2015-29-46.jpg
    2013-02-28%20at%2015-29-46.jpg
    137.3 KB · Views: 108
  • 2013-02-28%20at%2015-30-05.jpg
    2013-02-28%20at%2015-30-05.jpg
    141.7 KB · Views: 115
  • 2013-02-28%20at%2015-30-27.jpg
    2013-02-28%20at%2015-30-27.jpg
    122.2 KB · Views: 108
  • 2013-02-28%20at%2015-30-27.jpg
    2013-02-28%20at%2015-30-27.jpg
    122.2 KB · Views: 109
With my puffer tank I've learned; no moss, branches left bare except for java fern which is easy to thin out, no hair grass(holds crap) And other planting is large leaved plants such as crypts which allows for better water flow and takes debris to the intakes. You seem to be doing everything the exact opposite! That is lovely wood which I think if the branches went more upwards the puffers could weave between them. Currently it doesn't look like there would be space to do that now and planting would hide the wood further.
If you had the wood upright you could have alot of planting on the wood freeing up more substrate to allow flow around the base of the wood and plants. I may be talking crap, it's been a long day with a snotty toddler so feel free to 'dislike' and ignore my ramblings...Lovely puffers btw..
 
Thanks. Think I was saying that with EI you face more of a risk of algae growing on exposed hardscape than with very lean dosing and a rich substrate. That means you have less room for error with light (i.e. you should err on the safe side). But I still like it and use it.

Think this is right, but others will no doubt have views!

I'd say now that light and CO2 were more important than I'd realised early on (despite everyone here saying it all the time).

Have seen amazing hardscape cleanliness results with cutting light to 6 hours a day: rocks now almost completely clean with no scrubbing ever and just cherry shrimp and ottos.

Also worth saying totally stable CO2 though our photoperiod is vital for keeping BBA away.
 
Hi mate,

To start I wanna say its a great journal :) nice one for being brave and coming up against George like that :) Its great the way you have done it. People can see how angles, perspectives and positioning is all very important.

Think I was saying that with EI you face more of a risk of algae growing on exposed hardscape than with very lean dosing and a rich substrate.

I think its important to say though fertz have absolutely nothing to do with algae blooms, this is simply in a nutshell too much light, too little co2. I see you have suggested that the two important things are lighting and co2, your almost there yes but light is not as important as dosing the tank correctly and making sure the tank has a decent fluid flow distribution. If you can dose the tank and supply the tank with a consistant level of co2 ( no fluctuations) distributing this evenly, then the lighting can come last. of course lighting is important but this is the least importnat of the three.

Overall I think you can use what ever fertz you like, this wont cause or effect algae blooms. Consistency with anything added to the tank is the key :)

You have lovely wood mate is that redmoor?
 
Ok, so here's a quick update. Tank is growing in, but not really hardscaped as am waiting for bits and pieces to arrive for drilling. Slightly irritatingly, is the picture of health.
2013-03-20%20at%2021-44-26.jpg

And the puffers are loving it
2013-03-20%20at%2021-39-44.jpg


Just been fed, so plump belly
2013-03-20%20at%2021-40-24.jpg


Also took a video at feeding time - will post it up in a few minutes
 
Just read your thread mate really informative and a good read, I think that some of the parts where you do big summaries and go into detail on various things should be taken out and put in the tutorial section I know that me and many other new comes would find this really useful and it would get looked at a lot more
 
Ran out of CO2, and as I'm shortly stripping this tank down to drill it and replumb it back in, have decided to run as low tech. So turned off the T5 lights and just running with one Grobeam 500, which has one broken LED. Haven't done a water change in weeks, stopped dosing, and just bung in some frozen bloodworm every now and then. Filters give almost no flow as haven't cleaned in ages and the pipe work is way too low and there's no visible movement in any of the plants.

Irritatingly, the tank is looking healthier than ever, and certainly much better than the bigger tank. (The bit of mini landscape rock is in there to test how it looks under the lights. Have decided rescape post-drilling will be a simple hair grass / seriyu iwagumi).

Here's the front.
2013-04-24%20at%2023-39-58.jpg

And the back
2013-04-24%20at%2023-38-57.jpg
 
Hi mate.:) Don't feel bad about bumming off another's idea in aquascaping. Besides your threads have helped many of us beginners understand the complicated methods of aquascaping. You make it sound so funny & easy to understand.:) Besides we all have to start somewhere. The plant health looks great in this tank.
Looking forward to the rescape.
 
Here's a sneak preview of the hardscape I'm thinking about for this tank's next iteration (mocked up in a box in the garden)...
2013-04-26%20at%2018-43-13.jpg

Will be very simple hairgrass and perhaps a small clump of Hemianthus micranthemoides with lots of cherry shrimp to start with, and a small shoal of small fish added later - probably rasboras - going for a very classical look.
 
Puffers have gone back to the LFS :eek: so can now strip down the tank. Will be sad to see them go, but with only two tanks couldn't really justify it. Plus they're a hassle to feed when I go on holiday.

SO that means I have a load of Xmas moss (every bit you see in the pictures above) and a big crypt that won't be making the transition to the new tank, or going to my bigger tank. It's all wrapped up in an envelope and ready to be posted to the first person that wants it and is prepared to make a donation (any amount, whatever you think reasonable once you open the parcel) to UKAPS and post it in the thread. You'll also get some riccia (tiny bit) and elocharis ac. that I can't be bothered to separate.

Just let me know!
 
It begins... Tank did look like this:
2013-04-30%20at%2019-31-12.jpg

Then this
2013-04-30%20at%2020-18-33%20%281%29.jpg

Then this - blackboard paint to sides this time - was white before and getting horrible reflections - the puffers did way too much reflection following for my liking.
2013-05-01%20at%2018-39-03.jpg

Then the brave bit - drilling the bottom. Surprisingly easy to do with a special drill bit, just using the weight of the drill, patience, some kid's toys as blocks to keep the drill in the right place, and some water in the bottom to keep it all cool and not cracking. Here's one of two...
2013-05-01%20at%2018-47-23.jpg

Nearly plumbed in the new fittings and then will be good to go. And hopefully flow will be vastly improved as it won't be nearly 10 feet from tank to filter!
 
So the tank is back in place
2013-05-07%20at%2019-56-19.jpg

With the bottom drilled, tank connectors plumbed in and a cheap camping mat underneath, cut to size
2013-05-07%20at%2019-57-13.jpg

Bit of miracle grow (osmocote) scattered in the bottom as the molar clay substrate's inert but with high cation exchange capacity, so will soak up those slow release nutrients and hopefully bacteria will nuke the ammonia before it does any damage! Who needs ADA posh stuff, eh?
2013-05-07%20at%2020-20-32.jpg

In goes some fresh substrate (larger grain size molar clay) in the bottom, and the old fine grade substrate on top
2013-05-07%20at%2020-41-12.jpg

(Think have put a bit too much in actually! It's not like I'm planning on plants with big root systems...) Then a bit of a play around with the five bits of mini landscape rock I have - they're all the same size which makes it a lot harder... And tricky
to do a layout that looks good from one side
2013-05-08%20at%2022-43-52.jpg

And another at the same time
2013-05-08%20at%2022-45-31.jpg

Any comments or suggestions really welcome. (The white pipes are going as soon as some clear plastic tubing arrives in the right dimensions!) Also, how do I stop the reflections? Have never had a black background before and seems to reflect everything...
 
Back
Top