• You are viewing the forum as a Guest, please login (you can use your Facebook, Twitter, Google or Microsoft account to login) or register using this link: Log in or Sign Up
The dust has settled. Here's where I got to the first time round.
shuffle1.jpg

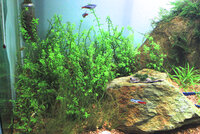
Much better in terms of 1/3s and grid, but the central stone with moss was dominating too much, and the tallest stone somehow felt inferior to the others. It tilting to the left also weakened the tension of the scape - the 'eye lines' in red I wanted weren't really emphasised by that stone.

So one minor reshaping later.
shuffle2.jpg


Slightly tighter to grid, but much better on diagonals and 'eye lines', and the tallest stone dominates much more. Planning for a thick carpet of staurogyne in the front, big blyxa bushes in the central point under the main stone, big dense rotala bush on back left and limnophila quite carefully trimmed (it's not here as am growing more stems) to emphasise the right hand red 'eye line', plus a small bacopa bush where the yellow focus point is.

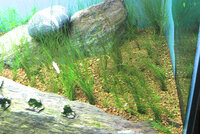
Think it's actually pretty amazing how much bigger the tank looks, and particularly how much deeper (it's 40cm). I put this down to the much better use of diagonals and the fact that each piece of hardscape is positioned at a different 'depth' from front to back, which gives it far more layers. One thing that makes this really obvious to me is how much emptier the tank looks even though all the plants have been replanted directly. What was quite lush now looks sparse!

Here's the bigger resolution FTS.
2013-03-05%20at%2021-43-48.jpg

When this is properly grown in, think will look much better than before. Plants slightly bunged in at the moment so it's looking pretty dominated by hardscape. Am relaxed though - as the stone fades out will get better and better.

[EDIT :cigar: Hmmm.... looking at this now, think might take out the back right stone and replace the big front right stone with two or three smaller ones in the same basic layout. Funny how things look different through a camera lens! And is a real lesson for me in how important to do the hardscape patiently and properly, leaving days for mulling over, before putting any water in. Any change now is basically a serious hassle so will ponder.]

Suggestions?
 
Just turn the back righ stone to the right so that it points to the right side of the tank. I think it will look better.

Anyways, really good work and very inspiring.
 
Great improvement mate. I really like the way you've used the compositional guides to create a better overall balance and impact. There's a valuable lesson there for many of us.

Well done and thanks for spending the time and effort to share. :)
 
Mike,...you could really turn this journal into a book. I bet there would thousands of newbies out there who could learn from this journal. Well done. I learnt a lot today:) .
 
Mike,...you could really turn this journal into a book. I bet there would thousands of newbies out there who could learn from this journal. Well done. I learnt a lot today:) .

Thanks - might do a composite at some point of all my threads here - but only when I've finally ended up with a great looking tank, so it can go from zero to decent IAPLC rank...
 
  • Like
Reactions: tim
Quick update. Here's a FTS:
2013-03-13%20at%2019-40-03%20%281%29.jpg

Particularly pleased with the bacopa stems 2/3 of the way to the right in the mid-ground. Think will make a good focal point. Will get rid of the crypt behind that into my other tank at some point and let it go around the rock.

Have added various peacock moss stones (Fissidens) to soften the rocks. Just moss tied to little chips of the main stone with fishing line, and in a couple of places attached with stainless steel mesh tucked into rocks. It's apparently a slow grower so will be patient, but at least it attaches. There's already Christmas moss on the top stone, which is lovely, but am getting fed up with how much tying back it needs - keeps trying to migrate across the tank and never roots to stones.
2013-03-13%20at%2019-44-21.jpg

Rotala is recovering from its big trim with lots of new shoots. Optimistic this is going to be a proper bush. Am going to let it get pretty unruly and to the top, then trim for shape.
2013-03-13%20at%2019-50-17.jpg

The Limonophila aromatica is seriously happy in this new scape. Have done two trims in a week, replanting tops. Is getting established now, so this will be the other big bush of stems. The Pogostemon stellata is still hiding... (but never had any luck with it in the past.
2013-03-13%20at%2019-50-44.jpg

Slightly concerned I may have killed a lot of cherry shrimp: can't seem to see anywhere near as many. But maybe they've just got new places to hide. Do Plecs eat them? That's the only change in fish I've had recently.
 
That'll teach me. Mental note: always clean filter properly after re-scaping with full tank...
Bummer! It will clear in no time ;) then ensure you clean the filter next time you turn it off :p
 
Slightly concerned I may have killed a lot of cherry shrimp: can't seem to see anywhere near as many.

You know all those big rocks you've put in the tank? I think they might be under them:dead: . Just kidding, shrimp are great at hiding and the clay you have is easy to blend into. I'm sure they will appear, maybe not all of them though;)
 
Quick update, mainly as have been playing with the camera rather than any real growth to speak of! This shot has quite a bit of punch, but the white balance is spot on and have finally realised that doing a tiny bit of devignetting in Aperture solves the issue of the corners of my FTS always being darker than in reality.

Think my main problem is not being able to get enough light into the scape for decent photographs...! Roll on getting an external flash - or maybe a couple of TMC 1500 tiles... Am seriously tempted.

IMG_0002%20%281%29.jpg
 
Looks really good mike, really opened my eyes your hardscape masterclass, appreciate the time and effort you put into it mate, you seem to have hit a nice balance with your rock work now, for me though the right most rock seems at odds with everything else this may not be so in the flesh so excuse if you think I'm wrong, but from the image without that rock this really would be spot on, good job indeed, enjoy your warts and all approach to your journals, keep the updates coming :)
 
Unedifying but hopefully helpful update for people who like to see things in their gestation, 'warts and all'. Close up of various bits just to get a sense of how far apart things are planted and for a comparison later when everything's looking lush and verdant and healthy :cigar: . Photos terrible, literally just point, shoot, crop, upload with no changing even settings on camera.

Big trim of limnophila tonight: should be a proper thicket next time it grows up. Am trimming that literally 10 times as much as any other plant. Is like a rocket.
2013-03-18%20at%2020-53-14.jpg


Rotala roundifolia bush in the back is taking longer than I'd like, but lots of stems and new growth there...
2013-03-18%20at%2020-53-19.jpg


Hairgrass on the left starting to fill in - doesn't look anywhere near this brown in real life!
2013-03-18%20at%2020-53-25.jpg


Pogostemon stellata still thinking about it at the back of the class
2013-03-18%20at%2020-53-30.jpg


Bacopa carolina starting to thicken up. Am trimming this a lot to try and get faster bushier growth. Never letting it get more than 10cm high. Is probably a bad approach but seems to be doing ok. My favourite plant of the moment.
2013-03-18%20at%2020-53-38.jpg


Staurogyne repens settling in on the right. Have found in general it takes a few weeks after being replanted to get its (huge) roots in place, then starts going for it.
2013-03-18%20at%2020-53-45.jpg


and left
2013-03-18%20at%2020-53-48.jpg


And Lileopolis brasiliensis deciding whether to thicken up or not.
2013-03-18%20at%2020-53-58.jpg


Although this lower light thing is keeping the rocks nice and pristine, it is taking its time with getting the plants to take off! Am starting to look for reasons to get some Aquabeam tiles basically...
 

Attachments

  • 2013-03-18%20at%2020-53-19.jpg
    2013-03-18%20at%2020-53-19.jpg
    1.5 MB · Views: 106
  • 2013-03-18%20at%2020-53-25.jpg
    2013-03-18%20at%2020-53-25.jpg
    1.5 MB · Views: 165
  • 2013-03-18%20at%2020-53-19.jpg
    2013-03-18%20at%2020-53-19.jpg
    1.5 MB · Views: 119
  • 2013-03-18%20at%2020-53-30.jpg
    2013-03-18%20at%2020-53-30.jpg
    1.1 MB · Views: 122
  • 2013-03-18%20at%2020-53-25.jpg
    2013-03-18%20at%2020-53-25.jpg
    1.5 MB · Views: 153
  • 2013-03-18%20at%2020-53-38.jpg
    2013-03-18%20at%2020-53-38.jpg
    1.1 MB · Views: 109
  • 2013-03-18%20at%2020-53-30.jpg
    2013-03-18%20at%2020-53-30.jpg
    1.1 MB · Views: 105
  • 2013-03-18%20at%2020-53-45.jpg
    2013-03-18%20at%2020-53-45.jpg
    1.2 MB · Views: 114
  • 2013-03-18%20at%2020-53-38.jpg
    2013-03-18%20at%2020-53-38.jpg
    1.1 MB · Views: 150
  • 2013-03-18%20at%2020-53-48.jpg
    2013-03-18%20at%2020-53-48.jpg
    786.7 KB · Views: 120
  • 2013-03-18%20at%2020-53-58.jpg
    2013-03-18%20at%2020-53-58.jpg
    659.3 KB · Views: 168
  • 2013-03-18%20at%2020-53-48.jpg
    2013-03-18%20at%2020-53-48.jpg
    786.7 KB · Views: 110
  • 2013-03-18%20at%2020-53-45.jpg
    2013-03-18%20at%2020-53-45.jpg
    1.2 MB · Views: 143
  • 2013-03-18%20at%2020-53-58.jpg
    2013-03-18%20at%2020-53-58.jpg
    659.3 KB · Views: 113
  • Like
Reactions: tim
Uh oh. Came back from a few days away to find the CO2 had run out. So have quite a bit of pinholing on leaves, which is very annoying. Luckily I had a spare FE and the London Beer Gas people could deliver me a replacement 3kg cylinder the same day I called.

Have finally come to the reluctant conclusion that my lighting just isn't cutting it. Plants grow great in the middle 1/3, but towards the sides of the tank they just stagnate. My luminaire is a good 30cm shorter than the tank, and it's not diffusing properly.

So have treated myself to a couple of these, seeing as lots of you lot have them and are getting great results. Am hoping that two are enough, going by Ian's results with HC with just one in a 60cm tank (half the length of mine, though mine is quite a bit deeper).

growbeam-1500-ultima-tile.png
growbeam-1500-ultima-box.png


Should be arriving tomorrow...! Hoping can get away without a power controller for a while by just altering the suspension height. Have a Grobeam 600 on my little tank and love the shimmer. Can't wait.

The other advantage is I should be able to keep the luminaire around for extra lighting for photo shoots. So no need to get any expensive flashes for the moment. Now I really have run out of excuses on both the photography and plant growth front.

Will try and do some controlled shots with manual exposure and canon's lens aberration correction to compare the lighting, distribution and brightness of the 4 * T5s and the LEDs. No PAR meter unfortunately, unless someone in London has one I can borrow for a day. Wish ADC hired them out.
 
So these arrived this afternoon
2013-03-28%20at%2019-05-39.jpg

How much difference have they made?

Here's a quick comparison shot of T5 lighting straight of the camera. This is quite a bit darker than it looks in reality, just wanted to underexpose to show the difference with the LEDs below.
2013-03-28%20at%2020-30-04%20%281%29.jpg

And here's a shot with the LED tank lighting, taken with the same ISO / aperture / lens correction / auto white balance / tripod position.
2013-03-28%20at%2021-25-29%20%281%29.jpg

You can see how much brighter these are (at least to the eye - who knows about PAR!) particularly towards the edges. Will see how they go and probably raise them up a bit to get more even spread. Nice shimmer too in the tank.

What I really like, too, is that I can now add in the old 4*T5 luminaire to do a full tank shot with quite a lot of light. Which even doing really quickly (i.e. just filters off, no cleaning of glass or anything special, and with just very standard photoshop tweaking for white balance and sharpness) gives me this:
2013-03-28%20at%2021-40-52%20%281%29.jpg

Now that's getting towards being a properly crisp shot - needs contrast and all that jazz sorting a bit, but the potential's now there. Am amazed by how much difference more than doubling the light for photos has made. So photography is pretty much there. Just to get it looking a bit lusher now.

Will probably DIY a luminaire-esque cover for the LEDs, as they spill quite a bit into the kitchen. But overall very happy with them.
 
Back
Top