
TomatoandEgg
Member
So ive always liked the idea of owning a fish tank and enjoyed looking at the AGA and IAPLC entrants after my father in law got a planted tank last yr. I decided to pull the trigger and purchased a bunch of equipment and a tank.
Ive never owned a fish or tank of any sort but the said screw it i might as well go large (relatively) and bought a 4 foot one. Its a local Malaysian brand. 120 x 45 x 45 15mm.
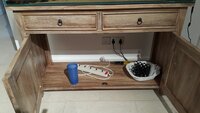
Then i realised i needed a stand!!! Ordered a custom sized teak piece from a furniture shop, Asked em to open up the back to allow pipes and wires through. The damn thing took 2 months to make and get shipped from indonesia, was torture seeing all my other stuff ready to go but with nowhere to sit.


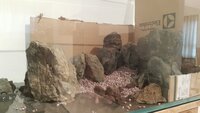
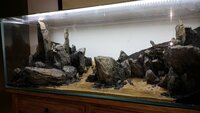
Bought around 50kg of seiryu stones. Tried arranging them outside the tank. Tried using stacked plastic drainage things to build up height to place rocks on. But i figured it was a pain in the ass to fill with rocks as the holes were pretty small and if i didnt fill em up i was sure my shrimp would find a way inside and end up living inside them instead of outside where i can see them.

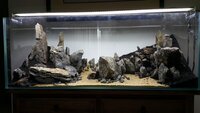
I went with lava stones as a base layer as i read so many people talking about aenerobic soil if the aquasoil was built up too high. Since for some strange reason i wanted some serious height. i lined my tank with cardboard to protect the glass and dumped in the lava rocks.

Ideally i would have used the big lumpy chunky ada soil they use on the greenmachine youtube channel since it looks like it would allow space for air to escape in the deep parts. but i couldn't find any so went with laval rock. Im pretty worried that my glass will be all scratched up when i come to rescape the tank. Have i already ****ed up my tank for future use?
I put gravel on top of the big lava rocks so i could more precisely arrange my seiryu stones . Turned out the gravel ended up going everywhere even after i put my aquasoil on top it ended up finding its way to the surface. on the other side of the tank i skipped the garvel and just mashed my stones into place.
On a side note i used aquarium silicone to stick a couple of the rocks together. I was worried about how to separate them for future use, whether i could get all the silicone off. I tested it by putting them ina 1000f furnace. vaporised that ****! Although the rock looked a bit smaller when it came out... so i dunno, it wasn't a very scientific conclusion.

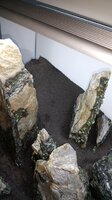
Followed shamans example of painting on moss. Got us fissidens and mini fissidens and some mini pelia. Here's the equipment:

here's after painting:

us fissidens at the bottom, mini mosses mid way and higher.

Covered in cling wrap and am misting 2 to 3 times a day. The top of the rocks seem to dry out easily so i think they are probably sucking all the moisture from my moss. The bottom of the stones stay wet as they suck moisture from the flooded substrate.
It's pretty hard to see the moss after painting it on, i'm half expecting nothing to happen and end up with naked rocks in 3 weeks time.

I didn't really have a particular vision for the tank, i just sort of mashed rocks together until got something i figured would look half decent when kinda obscured by moss n plants. i find the best hardscapes out there looks worse when fully grown in with plants because the fine rockwork is obscured , but it works the other way around too, which is good for me!
Gonna flood in 2 weeks and carpet with hc cuba and put some mini anubias and buceps around the stones.
Ive never owned a fish or tank of any sort but the said screw it i might as well go large (relatively) and bought a 4 foot one. Its a local Malaysian brand. 120 x 45 x 45 15mm.
Then i realised i needed a stand!!! Ordered a custom sized teak piece from a furniture shop, Asked em to open up the back to allow pipes and wires through. The damn thing took 2 months to make and get shipped from indonesia, was torture seeing all my other stuff ready to go but with nowhere to sit.
Bought around 50kg of seiryu stones. Tried arranging them outside the tank. Tried using stacked plastic drainage things to build up height to place rocks on. But i figured it was a pain in the ass to fill with rocks as the holes were pretty small and if i didnt fill em up i was sure my shrimp would find a way inside and end up living inside them instead of outside where i can see them.
I went with lava stones as a base layer as i read so many people talking about aenerobic soil if the aquasoil was built up too high. Since for some strange reason i wanted some serious height. i lined my tank with cardboard to protect the glass and dumped in the lava rocks.
Ideally i would have used the big lumpy chunky ada soil they use on the greenmachine youtube channel since it looks like it would allow space for air to escape in the deep parts. but i couldn't find any so went with laval rock. Im pretty worried that my glass will be all scratched up when i come to rescape the tank. Have i already ****ed up my tank for future use?
I put gravel on top of the big lava rocks so i could more precisely arrange my seiryu stones . Turned out the gravel ended up going everywhere even after i put my aquasoil on top it ended up finding its way to the surface. on the other side of the tank i skipped the garvel and just mashed my stones into place.
On a side note i used aquarium silicone to stick a couple of the rocks together. I was worried about how to separate them for future use, whether i could get all the silicone off. I tested it by putting them ina 1000f furnace. vaporised that ****! Although the rock looked a bit smaller when it came out... so i dunno, it wasn't a very scientific conclusion.
Followed shamans example of painting on moss. Got us fissidens and mini fissidens and some mini pelia. Here's the equipment:
here's after painting:
us fissidens at the bottom, mini mosses mid way and higher.
Covered in cling wrap and am misting 2 to 3 times a day. The top of the rocks seem to dry out easily so i think they are probably sucking all the moisture from my moss. The bottom of the stones stay wet as they suck moisture from the flooded substrate.
It's pretty hard to see the moss after painting it on, i'm half expecting nothing to happen and end up with naked rocks in 3 weeks time.
I didn't really have a particular vision for the tank, i just sort of mashed rocks together until got something i figured would look half decent when kinda obscured by moss n plants. i find the best hardscapes out there looks worse when fully grown in with plants because the fine rockwork is obscured , but it works the other way around too, which is good for me!
Gonna flood in 2 weeks and carpet with hc cuba and put some mini anubias and buceps around the stones.
Attachments
-
 CVjXnv.jpg276 KB · Views: 148
 -
 CVjXnv.jpg276 KB · Views: 139
 -
 CVjXnv.jpg276 KB · Views: 163
 -
 CVjXnv.jpg276 KB · Views: 143
 -
 CVjXnv.jpg276 KB · Views: 152
 -
 Z9rTLb.jpg243.4 KB · Views: 158
 -
 3aQZS4.jpg266.6 KB · Views: 134
 -
 3aQZS4.jpg266.6 KB · Views: 140
 -
 Z9rTLb.jpg243.4 KB · Views: 154
 -
 Z9rTLb.jpg243.4 KB · Views: 143
 -
 Z9rTLb.jpg243.4 KB · Views: 164
 -
 Z9rTLb.jpg243.4 KB · Views: 147
 -
 3aQZS4.jpg266.6 KB · Views: 149
 -
 3aQZS4.jpg266.6 KB · Views: 151
 -
 3aQZS4.jpg266.6 KB · Views: 147
 -
 TJ1src.jpg203.3 KB · Views: 147
 -
 AMvT33.jpg94 KB · Views: 139
 -
 tkG7Vu.jpg274.5 KB · Views: 154
 -
 TJ1src.jpg203.3 KB · Views: 168
 -
 TJ1src.jpg203.3 KB · Views: 142
 -
 TJ1src.jpg203.3 KB · Views: 150
 -
 TJ1src.jpg203.3 KB · Views: 147
 -
 AMvT33.jpg94 KB · Views: 133
 -
 AMvT33.jpg94 KB · Views: 154
 -
 AMvT33.jpg94 KB · Views: 143
 -
 AMvT33.jpg94 KB · Views: 150
 -
 tkG7Vu.jpg274.5 KB · Views: 149
 -
 tkG7Vu.jpg274.5 KB · Views: 151
 -
 tkG7Vu.jpg274.5 KB · Views: 152
 -
 tkG7Vu.jpg274.5 KB · Views: 161
")
