Hi another new member here,
just found this thread as I was about to post seeking advice on how to keep your plants alive when your tank breaks… your self-built acrylic tank. While your next acrylic aquarium project and MK1 tank replacement gushes water all over the deck on its first water test. A fail then.
I really love acrylic tanks for their light transmission, lightness, and the fact acrylic is more thermally efficient than glass so they hold on to the heat. I haven't found that it scratches that easily and if it does you can polish the scratches out - I've not had to do that, but it might be something to bear in mind if you're mixing an acrylic tank with small children.
Despite feeling a bit negative about the whole process right now I'd still have to say that I've enjoyed the process of making both the tanks I've built - even if I'm at some point (very soon) going to have to remake them. So if you are going to build in acrylic here's what I've learned - good and bad.
As other posters have pointed out you need to be building in Perspex (which is a brand name) or one of the many other cell cast acrylics available - there are plenty of suppliers that sell online - I used
Cut Plastic Sheeting, they will cut to size and do the edge prep for you (another note on that in a bit).
Getting the right acrylic cement is harder, I tracked down some Weld On 4 as used by the King of DIY - from seemingly the only UK supplier. It wasn't that expensive, but you can only buy it by the pint and that's enough to make either one VERY large aquarium or a few hundred of the size you'd fit in your lounge. It's also quite noxious stuff - I'd worry about the King's future heath given that in some of his vids he's running it through his fingers and doesn't appear to use a mask - the technical sheet advises gloves, goggles, mask, the works. I togged up as much as I could which makes cementing the seams more awkward - if I was doing it again, I'd seriously consider wearing some sort of respirator. I built the first one outside and the fumes were still amazingly strong even with a mask on. Second one I built in a loft room with four windows all open, and I used a syringe for applying the cement (which did make things less fumey than applicator bottle and needle i used first time round).
Once you get on to the build here's what you need to consider…
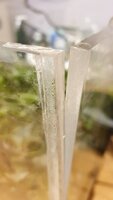
1. Edge prep - even if you get the cut sides prepped by your acrylic supplier chances are they will still be a bit rougher than you want. Any saw mark or uneveness is a potential problem down the line. I think that's why the seam on Mk 1 just popped. If I was doing this again I would consider having all the edges polished by the supplier and then carefully re-roughening them (polished edged can't be cemented together) with something like a 240 grit paper or maybe even some wet and dry - that way you should get a flat smooth edge. I had to do that with two edges on the side panels of Mk2 and I noticed I got two really nice clear seams.
2. Always glue on the horizontal, start with the back or front pane lying flat and come off that. The first two panels are the most important, and gluing them at a perfect right angle is harder than it looks, so arm yourself with plenty of clamps and a form to hold them in place.
3. Use a gluing method appropriate to the size of sheet your using. I wanted a shallow tank with plants growing emergent so for a 600x260x40 I went with 8mm acrylic and the best gluing method for that (for me at least is the capillary method). Mk2's undoing was my foolish decision to switch gluing methods for the final panel - the base - to the pin method on the basis that I would be sure to get enough cement in. In reality the gap even using very fine fuse wire instead of pins was too big and in one small but crucial spot the cement flowed straight through. And it had all been going so well.
4. You'll need some clamps - at least six. If you're building a taller aquarium bear in mind that longer clamps can cost a lot of money.
5. Keep an eye on your seams, any whiteness/crazing is basically weakness - experience now tells me that even in a shallow aquarium it will pop.
I'd still like to have another go - maybe see if the base can be routed off Mk2 and then I can re-prep and glue, but if I was doing this again I'd start of with some very small projects to really master the prep and gluing techniques. When I build MK1 I asked my supplier if they could throw in some off-cuts that I could practice on and they did - it was very useful too, but really what I should have done was practice making some very small tanks. What would put me off is dealing with the acrylic cement - it really is horrible stuff.
In the meantime I've got my shrimp and java fern in an ikea plastic crate, and I'm off to borrow a friend's tank to put them in. Then I'm going to order an opti-white one from Charterhouse and bung in one of the Tunze RO stations so I can put it all on interest free credit and not think about how much I've spent on acrylic sheet and clamps (actually they didn't cost that much).

") and at that point it still is a chemical reaction.
and at that point it still is a chemical reaction.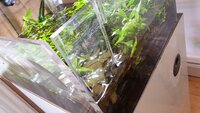
 So beware and go easy on that part
