
Hi all.
So in 2013 I purchased a tank from ND Aquatics. The size of it was 68"x24"x30". It was made to fit in the space I had at the time, now I'm wishing I'd bought a 7ft tank... anyway, nothing happened with it for some time as the threat of moving house was always close by with the missus yo-yoing on the decision for literally years until I decided in 2017 that we were going to move. It took a couple of years of looking but we finally found a house we all loved and moved into it in August 2019. Then there were the (and still are) typical projects of things to do around the house before the finances became freed up for the tank to be worked on. That was the middle of February.
Firstly, apologies for all the bad photos, I'm taking these on my phone and am no expert by any stretch of the imagination.
This is my first attempt at a planted aquarium. I'm hoping to try and make it heavily planted as I have a lot of space that looks pretty empty still, as you'll see in the later photos.
The first thing I wanted to do was check to see if it could hold water, just to sanity check that it had survived the move unscathed, as during the move it wasn't necessarily treated as delicately as I would have liked. It took four of us to lift it... the squeeze through doorways was the worst... and this had to be tipped onto it's side to twist it through the door into the study due to the proximity of the stairs to the room. It held water but this highlighted a problem that I'll get onto shortly.
Here is the tank in what was an overcrowded study that was used as a home office and storage room/dumping ground:

I purchased a couple of Oase 850 Biomaster Thermos and plumbed them in. When I had filled the tank to see whether it held water, I'd seen that it wasn't level. I hadn't even considered that it wouldn't have been until I saw it with my own eyes. The tank was sort of angled leaning slightly forwards and off to the right. I began scouring the internet looking for ways I could fix this, even scrambling to another company requesting quotes to build me a cabinet with adjustable feet and build it on site. It was pretty silly of me to have done this, but I wanted to consider my options.
In the end I emptied the room of everything but the tank and moved the tank to where my desk was so it was facing a north-facing window. This was better for me, since lockdown I've had my back to the window and my screens have been reflecting the glare of outside. I managed to clear up the clutter by donating our books to BHF, emptied any boxes and discarded what wasn't needed and overall just made the room easier to navigate and work in.
I had ordered 20kg of grey mountain stone from Riverwood Aquatics. I hadn't seen or chosen the pieces so had to rely on the staff there on making the choices, overall I was pretty happy with the selections. Perhaps not with the consistency of the different pieces themselves, such as the colouring on them, but overall I was pleased. I had a 2 large pieces of wood that I had purchased from Wharf Aquatics and wanted to see what I could come up with as a layout, so laid a towel on the floor in front of the tank and messed around with various placements.

This isn't what I settled for, but the more I played around with the layouts, the more I realised that both of these were too big to both be in the tank. They would have fit, but it wasn't worth wasting so much space with two feature pieces. I decided to go with the darker one on the left. It has a lot of visible grainy character, and I wasn't happy with the overall footprint of the one on the right, with it sprawling quite easily from the front to back of the tank and not able to twist it into different angles.
Anyway, losing one large piece of wood lead to more void space that needed filling, so I ordered another 15kg of the grey mountain stone.
Once again, I was really pleased with the rock selections. Once everything arrived, I decided to crack on and get everything into the tank.

The base layer was Tropica Aquarium Soil. I think I ended up dumping four 9 litre bags of the stuff into the tank. With the background of the tank being black and the size of the pieces being so big, I wasn't happy with it, so this ended up being capped with 32-ish kg of Unipac aquarium silver sand.
Numerous schoolboy errors were made along the way:

Don't judge the Uni Kitty cup, I was using it to scoop sand into the tank lol!
Anyway, I had a few stones I hadn't used and attempted to weigh this wood down. It worked for about 30 minutes, then I heard a crash and the stone had been chucked off and the wood was back coasting on the waterline. It had kicked up a lot of soil in the process too. I let it sit like this for about a week before I decided I didn't like what I had done with the rocks. They were too linear and I hadn't made good use of depth. Also, the cracks running through the stone weren't on full display with them being in the positions I had them in. My thought was to lay them down. That would create more void space, so I ordered more wood from Scaped Nature. I had ordered redmoor wood, 1* XL, 2* large and 3* small. These were reasonably priced and were exactly what I needed. This time, however, I wasn't about to be defeated by buoyancy! Well... that's what I thought anyway...
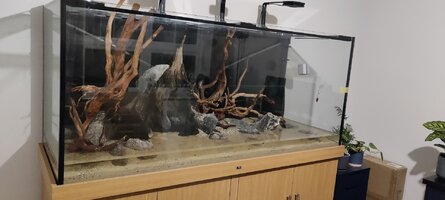
This is the layout I decided to go with:

I used this as an opportunity to weigh down the largest wood with a stone after I'd laid more sand over the exposed soil. I used some expanding foam to stick four pieces together and bond them to stones to the right. I did the same to the XL piece on the left. I was still a little unhappy with the stones appearing linear on the right, so I moved them a couple of them to a different position.
I filled the tank to about 2/3 and let it run for a couple of days. The noise was terrible and the humidity in the room went up to 55%. I did this as I was afraid the buoyancy would pop something out of position and I didn't want the soil to be disturbed by the movement of any wood.

That was until last night, when I ended up just filling it. I was really pleased with how it looked.

Until the inevitable happened. 😭

I only turn lights on for a minute when taking pictures, but I noticed some thin algae on some of the wood that looked like snot. I scraped this off this morning.
This is where I am at the moment. I'm still waiting for nitrites to show up, but I've disturbed the cycle a couple of times since setting it up. I think I'm going to consider it as a restart from yesterday.
Many thanks to @Wookii for suggesting I post this in a journal and for kindly donating some used filter media. I was put off posting this as a journal initially when I saw how awesome and impressive other users aquariums looked and I felt comparatively embarrassed.
Once again, sorry if there are too many pictures and the poor quality of them. I'm quite excited to about this project due to it being almost 8 effing years in the making. 🤪
So in 2013 I purchased a tank from ND Aquatics. The size of it was 68"x24"x30". It was made to fit in the space I had at the time, now I'm wishing I'd bought a 7ft tank... anyway, nothing happened with it for some time as the threat of moving house was always close by with the missus yo-yoing on the decision for literally years until I decided in 2017 that we were going to move. It took a couple of years of looking but we finally found a house we all loved and moved into it in August 2019. Then there were the (and still are) typical projects of things to do around the house before the finances became freed up for the tank to be worked on. That was the middle of February.
Firstly, apologies for all the bad photos, I'm taking these on my phone and am no expert by any stretch of the imagination.
This is my first attempt at a planted aquarium. I'm hoping to try and make it heavily planted as I have a lot of space that looks pretty empty still, as you'll see in the later photos.
The first thing I wanted to do was check to see if it could hold water, just to sanity check that it had survived the move unscathed, as during the move it wasn't necessarily treated as delicately as I would have liked. It took four of us to lift it... the squeeze through doorways was the worst... and this had to be tipped onto it's side to twist it through the door into the study due to the proximity of the stairs to the room. It held water but this highlighted a problem that I'll get onto shortly.
Here is the tank in what was an overcrowded study that was used as a home office and storage room/dumping ground:
I purchased a couple of Oase 850 Biomaster Thermos and plumbed them in. When I had filled the tank to see whether it held water, I'd seen that it wasn't level. I hadn't even considered that it wouldn't have been until I saw it with my own eyes. The tank was sort of angled leaning slightly forwards and off to the right. I began scouring the internet looking for ways I could fix this, even scrambling to another company requesting quotes to build me a cabinet with adjustable feet and build it on site. It was pretty silly of me to have done this, but I wanted to consider my options.
In the end I emptied the room of everything but the tank and moved the tank to where my desk was so it was facing a north-facing window. This was better for me, since lockdown I've had my back to the window and my screens have been reflecting the glare of outside. I managed to clear up the clutter by donating our books to BHF, emptied any boxes and discarded what wasn't needed and overall just made the room easier to navigate and work in.
I had ordered 20kg of grey mountain stone from Riverwood Aquatics. I hadn't seen or chosen the pieces so had to rely on the staff there on making the choices, overall I was pretty happy with the selections. Perhaps not with the consistency of the different pieces themselves, such as the colouring on them, but overall I was pleased. I had a 2 large pieces of wood that I had purchased from Wharf Aquatics and wanted to see what I could come up with as a layout, so laid a towel on the floor in front of the tank and messed around with various placements.
This isn't what I settled for, but the more I played around with the layouts, the more I realised that both of these were too big to both be in the tank. They would have fit, but it wasn't worth wasting so much space with two feature pieces. I decided to go with the darker one on the left. It has a lot of visible grainy character, and I wasn't happy with the overall footprint of the one on the right, with it sprawling quite easily from the front to back of the tank and not able to twist it into different angles.
Anyway, losing one large piece of wood lead to more void space that needed filling, so I ordered another 15kg of the grey mountain stone.
Once again, I was really pleased with the rock selections. Once everything arrived, I decided to crack on and get everything into the tank.
The base layer was Tropica Aquarium Soil. I think I ended up dumping four 9 litre bags of the stuff into the tank. With the background of the tank being black and the size of the pieces being so big, I wasn't happy with it, so this ended up being capped with 32-ish kg of Unipac aquarium silver sand.
Numerous schoolboy errors were made along the way:
Don't judge the Uni Kitty cup, I was using it to scoop sand into the tank lol!
Anyway, I had a few stones I hadn't used and attempted to weigh this wood down. It worked for about 30 minutes, then I heard a crash and the stone had been chucked off and the wood was back coasting on the waterline. It had kicked up a lot of soil in the process too. I let it sit like this for about a week before I decided I didn't like what I had done with the rocks. They were too linear and I hadn't made good use of depth. Also, the cracks running through the stone weren't on full display with them being in the positions I had them in. My thought was to lay them down. That would create more void space, so I ordered more wood from Scaped Nature. I had ordered redmoor wood, 1* XL, 2* large and 3* small. These were reasonably priced and were exactly what I needed. This time, however, I wasn't about to be defeated by buoyancy! Well... that's what I thought anyway...
This is the layout I decided to go with:
I used this as an opportunity to weigh down the largest wood with a stone after I'd laid more sand over the exposed soil. I used some expanding foam to stick four pieces together and bond them to stones to the right. I did the same to the XL piece on the left. I was still a little unhappy with the stones appearing linear on the right, so I moved them a couple of them to a different position.
I filled the tank to about 2/3 and let it run for a couple of days. The noise was terrible and the humidity in the room went up to 55%. I did this as I was afraid the buoyancy would pop something out of position and I didn't want the soil to be disturbed by the movement of any wood.
That was until last night, when I ended up just filling it. I was really pleased with how it looked.
Until the inevitable happened. 😭
I only turn lights on for a minute when taking pictures, but I noticed some thin algae on some of the wood that looked like snot. I scraped this off this morning.
This is where I am at the moment. I'm still waiting for nitrites to show up, but I've disturbed the cycle a couple of times since setting it up. I think I'm going to consider it as a restart from yesterday.
Many thanks to @Wookii for suggesting I post this in a journal and for kindly donating some used filter media. I was put off posting this as a journal initially when I saw how awesome and impressive other users aquariums looked and I felt comparatively embarrassed.
Once again, sorry if there are too many pictures and the poor quality of them. I'm quite excited to about this project due to it being almost 8 effing years in the making. 🤪
Attachments
Last edited:
 ). The wood will eventually sink. It will get some mouldy fuzz on it for a while but that will go in time. And then you'll be off and running.