
matt
Member
- Joined
- 4 Dec 2012
- Messages
- 73
Hi all ukaps diy'ers,
This is a project I've had in the pipeline for the last year or so now,ironically recent ill health has afforded me the time to actually crack on and get it done,I'm very happy with the results so I thought I'd share with you guys.
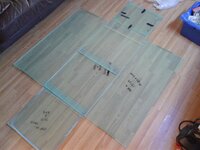
Cut to size acrylic sheets

Base and front panel cemented


Next the side panels


And the back panel

Bracing

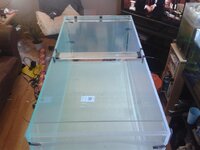
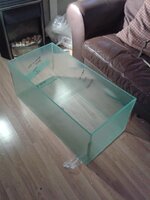
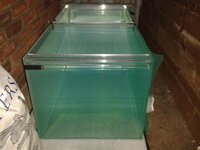
One completed acrylic tank

Tank dimensions:
Base: 980x475mm
Front and rear panels: 980x400mm
Sides: 455x400mm
Bracingx3 455x50mm
Acrylic thickness: 10mm
All acrylic was cut to order,cost inc delivery:£126.62
The acrylic sheets was purchased through Acrylic Online – Cut to Size Acrylic | Cut to Size Solid Polycarbonate | Polycarbonate, other vendors are available but I found this company's website very easy to use,you simply put in the acrylic size you want in mm and it gives you a price per sheet instantly,none of this Email us your specifications and we'll get back to you in a few days(maybe)nonsense.
Acrylic bonding agent used:
Scigrip weld on 4sc 473ml £6.93
scigirp weld on 16 473ml £7.91
Carriage £8.00
Purchased through Multibond Solutions Limited - Adhesives, Sealants, Tapes and Surface Treatments
The bonding agent which is called an" Acrylic cement" (but not really a cement,don't ask)causes a chemical reaction between the two acrylic pieces causing them to bond or fuse together,I'm not really sure of how it really works,I like to think of it as magic or google it for a proper explanation.
Anyhoo this stuff works quick,like real quick within 3 minutes this stuff is stuck hard and will not move without force and causing real damage to the acrylic,I spent the best part of 30-45 mins making sure that each piece was lined up perfect and dead flat at an 90 degree angle,then checked it again and again and once more just to be sure,then again from a distance,then again from another corner of the room and then finally once more just too make absolutely sure,then knocked it with my elbow as I turned round to grab the acrylic cement/bonding agent/magic liquid And repeat process this time elbows tucked in.
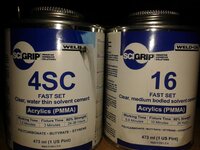
As you can see I have two different types of acrylic cement,the weld on 4sc and the weld on 16.
The weld on 4sc is of liquid consistency and is the only one of the two that I acutely used for this build,the weld on 16 is a thicker liquid consistency like that of a gel type superglue and is only needed if after construction you find any gaps or leaks to fill said problems.
Picture of acrylic cement

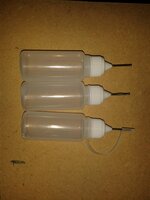
Okay,next up applicater bottles look a bit like this

 [/URL][/IMG]
Used to apply the acrylic cement cost £5 from ebay there is loads of suppliers on there so take your pick,I think the ones I got were N gauge size but to be honest a smaller size needle would have been better as I found out when I first used one and ended up spilling half the bottle all over the the place,luckley on any other surface than acrylic it quickley evaporates and leaves no marks,any spilt on acrylic however will leave a white mark and look unsightly on the tank as I found out.
Ok,so before you begin there are a few things you need to do in order to get a good bond,frist and most important check that the pieces acutely fit first,I moked mine up by simply by using tape,as long as all the acrylic is square it should stand under it's own weight
The moke up

When the acrylic arrived there are saw marks on the cut edges,one way to get rid of them is to use a router,having never used one myself I didn't feel comfortable enough to start now as I didn't want to ruine it by taking to much off or slipping and doing severe damage.
An alternative which I used was wet/dry sand paper and some good old elbow grease.
Starting with 1200grit,this was the grade paper that I used to to completely remove all the saw marks
being very careful not to stay on one area to long to cause un-even ware,it's worth pointing out at this point that I used a flat sanding block which is very important as by using a dead flat surface to sand the acrylic is crucial so not to round off any of the edges.
Also keeping the wet/dry paper wet at all times so you don't burn or melt the arcylic due to friction,I simply kept a bowl of water near at all times,too near sometimes which ended up with many a wet foot/floor sock changing palaver(oh well,live and learn).
Once I had gotten ride of all the saw marks with the 1200grit grade paper which is a very slow a boring process I then moved on to 1500 grit,eventually working all the way up to 2500 grit wet/dry.
As i moved up a grit grade it became easier each time as less time and effort was required as the surface became smoother each time,I spent no more than about 1 minute on each surface with the 2500 paper before I was happy with the finish.
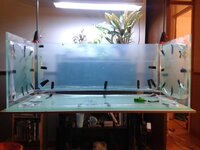
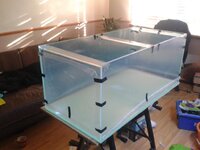
With all the sawn surfaces now flat and smooth it was time to glue,the hardest and the most important panel first,the front panel.This needs to be perfect as it will dictate how the whole tank turns out,get it wrong and it could be a disaster as stated earlier the bonding agent works fast and once it's stuck it's stuck.As you can see in the 2nd and 3rd photo from the top I used the help of two clamps,now the problem with using clamps is that if you apply too much pressure to the base you'll stop the liquid cement from entering the gap of the two panels and it won't bond properly,but I needed the use of the clamps as there was a slight bow to both the panels used for the front and back and the clamps aloud me to hold the corners in place so I could straighten the front panel to aline perfectly,luckly for me it worked well
Nearly there...................................
Now with the front panel in place time to do the sides,this bit was a piece of cake with the front panel lined up perfectly lining the sides up was easy and took just a few minutes,now with the sides sorted
the back panel just fell into place...yay.
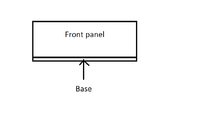
I should have probably gone through this bit earlier but all the panels front and sides do sit on top of the base panel,I hope these basic drawings are adequate enough to show you what I mean
Front facing view

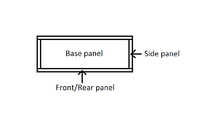
View from above

As you can see from this drawing the front and rear panels run the full length of the base panel,where as the side panels sit inbetween the front and rear panels.
It's also worth noting that you have to allow for the thickness of the acrylic when ordering your panels
for instance my tank base is 980mm L x 475mm W so the front and rear panels are 980mm L.
But because the thickness of the acrylic is 10mm's the side panels cannot be 475mm's.To fit inside the front and rear panel they have to be 455mm's to allow for the 20mm difference between the front and rear panels.
Right think I've covered nearly everything just a few more bits.
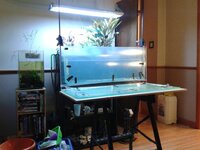
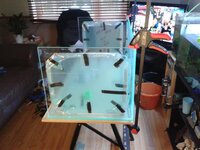
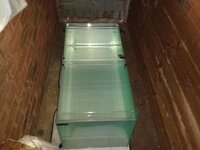
I finished this project early last thursday afternoon around 1400 and left it to stand for just over 48 hours,around 1600 satuarday I took it in my car around to my mum's house to fill it with water,because I live in a flat with no covered outside space I didn't want to risk filling it up and flooding my place.The next photos were taken at around 1730 yesterday


So just over 48 hours filled with water and no visible signs of leaks or dampness anywhere.
The bit of tape on the top left of the tank is to indicate the water level when filled and appears not to have at all,so fingers crossed it will be good to go soon")
If I think of anything else of use I will add as and when I remember.
And if I can do it anyone can do it,this is my very first tank build,Iv'e never attempted one before,but it won't be my last.
Good luck to anyone else who gives this a bash,if you need any help pm me or leave a message on this thread and I'll try my best to help out if I can.
Now go and start building your own acrylic tanks and saving yourself £££'s along the way 
This is a project I've had in the pipeline for the last year or so now,ironically recent ill health has afforded me the time to actually crack on and get it done,I'm very happy with the results so I thought I'd share with you guys.
Cut to size acrylic sheets
Base and front panel cemented
Next the side panels
And the back panel
Bracing
One completed acrylic tank
Tank dimensions:
Base: 980x475mm
Front and rear panels: 980x400mm
Sides: 455x400mm
Bracingx3 455x50mm
Acrylic thickness: 10mm
All acrylic was cut to order,cost inc delivery:£126.62
The acrylic sheets was purchased through Acrylic Online – Cut to Size Acrylic | Cut to Size Solid Polycarbonate | Polycarbonate, other vendors are available but I found this company's website very easy to use,you simply put in the acrylic size you want in mm and it gives you a price per sheet instantly,none of this Email us your specifications and we'll get back to you in a few days(maybe)nonsense.
Acrylic bonding agent used:
Scigrip weld on 4sc 473ml £6.93
scigirp weld on 16 473ml £7.91
Carriage £8.00
Purchased through Multibond Solutions Limited - Adhesives, Sealants, Tapes and Surface Treatments
The bonding agent which is called an" Acrylic cement" (but not really a cement,don't ask)causes a chemical reaction between the two acrylic pieces causing them to bond or fuse together,I'm not really sure of how it really works,I like to think of it as magic
Anyhoo this stuff works quick,like real quick within 3 minutes this stuff is stuck hard and will not move without force and causing real damage to the acrylic,I spent the best part of 30-45 mins making sure that each piece was lined up perfect and dead flat at an 90 degree angle,then checked it again and again and once more just to be sure,then again from a distance,then again from another corner of the room and then finally once more just too make absolutely sure,then knocked it with my elbow as I turned round to grab the acrylic cement/bonding agent/magic liquid
And repeat process this time elbows tucked in.As you can see I have two different types of acrylic cement,the weld on 4sc and the weld on 16.
The weld on 4sc is of liquid consistency and is the only one of the two that I acutely used for this build,the weld on 16 is a thicker liquid consistency like that of a gel type superglue and is only needed if after construction you find any gaps or leaks to fill said problems.
Picture of acrylic cement
Okay,next up applicater bottles look a bit like this
Used to apply the acrylic cement cost £5 from ebay there is loads of suppliers on there so take your pick,I think the ones I got were N gauge size but to be honest a smaller size needle would have been better as I found out when I first used one and ended up spilling half the bottle all over the the place,luckley on any other surface than acrylic it quickley evaporates and leaves no marks,any spilt on acrylic however will leave a white mark and look unsightly on the tank as I found out.
Ok,so before you begin there are a few things you need to do in order to get a good bond,frist and most important check that the pieces acutely fit first,I moked mine up by simply by using tape,as long as all the acrylic is square it should stand under it's own weight
The moke up
When the acrylic arrived there are saw marks on the cut edges,one way to get rid of them is to use a router,having never used one myself I didn't feel comfortable enough to start now as I didn't want to ruine it by taking to much off or slipping and doing severe damage.
An alternative which I used was wet/dry sand paper and some good old elbow grease.
Starting with 1200grit,this was the grade paper that I used to to completely remove all the saw marks
being very careful not to stay on one area to long to cause un-even ware,it's worth pointing out at this point that I used a flat sanding block which is very important as by using a dead flat surface to sand the acrylic is crucial so not to round off any of the edges.
Also keeping the wet/dry paper wet at all times so you don't burn or melt the arcylic due to friction,I simply kept a bowl of water near at all times,too near sometimes which ended up with many a wet foot/floor sock changing palaver(oh well,live and learn).
Once I had gotten ride of all the saw marks with the 1200grit grade paper which is a very slow a boring process I then moved on to 1500 grit,eventually working all the way up to 2500 grit wet/dry.
As i moved up a grit grade it became easier each time as less time and effort was required as the surface became smoother each time,I spent no more than about 1 minute on each surface with the 2500 paper before I was happy with the finish.
With all the sawn surfaces now flat and smooth it was time to glue,the hardest and the most important panel first,the front panel.This needs to be perfect as it will dictate how the whole tank turns out,get it wrong and it could be a disaster as stated earlier the bonding agent works fast and once it's stuck it's stuck.As you can see in the 2nd and 3rd photo from the top I used the help of two clamps,now the problem with using clamps is that if you apply too much pressure to the base you'll stop the liquid cement from entering the gap of the two panels and it won't bond properly,but I needed the use of the clamps as there was a slight bow to both the panels used for the front and back and the clamps aloud me to hold the corners in place so I could straighten the front panel to aline perfectly,luckly for me it worked well
Nearly there...................................
Now with the front panel in place time to do the sides,this bit was a piece of cake with the front panel lined up perfectly lining the sides up was easy and took just a few minutes,now with the sides sorted
the back panel just fell into place...yay.
I should have probably gone through this bit earlier but all the panels front and sides do sit on top of the base panel,I hope these basic drawings are adequate enough to show you what I mean
Front facing view
View from above
As you can see from this drawing the front and rear panels run the full length of the base panel,where as the side panels sit inbetween the front and rear panels.
It's also worth noting that you have to allow for the thickness of the acrylic when ordering your panels
for instance my tank base is 980mm L x 475mm W so the front and rear panels are 980mm L.
But because the thickness of the acrylic is 10mm's the side panels cannot be 475mm's.To fit inside the front and rear panel they have to be 455mm's to allow for the 20mm difference between the front and rear panels.
Right think I've covered nearly everything just a few more bits.
I finished this project early last thursday afternoon around 1400 and left it to stand for just over 48 hours,around 1600 satuarday I took it in my car around to my mum's house to fill it with water,because I live in a flat with no covered outside space I didn't want to risk filling it up and flooding my place.The next photos were taken at around 1730 yesterday
So just over 48 hours filled with water and no visible signs of leaks or dampness anywhere.
The bit of tape on the top left of the tank is to indicate the water level when filled and appears not to have at all,so fingers crossed it will be good to go soon
If I think of anything else of use I will add as and when I remember.
And if I can do it anyone can do it,this is my very first tank build,Iv'e never attempted one before,but it won't be my last.
Good luck to anyone else who gives this a bash,if you need any help pm me or leave a message on this thread and I'll try my best to help out if I can.
Now go and start building your own acrylic tanks and saving yourself £££'s along the way
Attachments
-
 tankphotos004_zps0d62449d.jpg73.1 KB · Views: 1,016
 -
 tankphotos005_zps511b37e5.jpg87.6 KB · Views: 558
 -
 tankphotos006_zpsf367174d.jpg89.6 KB · Views: 409
 -
 tankphotos009_zps1c6aae24.jpg79 KB · Views: 1,407
 -
 tankphotos010_zps181ef86b.jpg89.4 KB · Views: 341
 -
 tankphotos012_zps9a3bb468.jpg61.9 KB · Views: 279
 -
 tankphotos013_zpsa657549b.jpg67.3 KB · Views: 1,314
 -
 tankphotos014_zpse821c512.jpg64.9 KB · Views: 7,846
 -
 tankphotos017_zpsec991fcf.jpg99.8 KB · Views: 1,422
 -
 tankphotos018_zpsae8d25eb.jpg76.8 KB · Views: 311
 -
 newphone045_zps11e2bf15.jpg73.1 KB · Views: 228
 -
 tankdio_zps7c946b6b.png4.1 KB · Views: 238
 -
 tankdio2_zpsc8211a36.png8 KB · Views: 226
 -
 newphone045_zps11e2bf15.jpg73.1 KB · Views: 237
 -
 tankdio_zps7c946b6b.png4.1 KB · Views: 223
 -
 tankdio2_zpsc8211a36.png8 KB · Views: 222
 -
 tankphotos015_zpsda80916f.jpg69.3 KB · Views: 229
 -
 tankphotos015_zpsda80916f.jpg69.3 KB · Views: 215
 -
 tankphotos016_zpsd11b204e.jpg66.5 KB · Views: 262
 -
 tankphotos016_zpsd11b204e.jpg66.5 KB · Views: 244