This guide is how I went about building an ADA style cabinet for an ADA 60P aquarium.
I started using these plans that I found elsewhere on UKAPS
View attachment 133035
View attachment 133034
I took these down to my local B&Q store, picked up a full size (2440 x 1220 x 18) sheet of 18mm thick MDF and headed straight to cutting service. I explained to the person manning the saw what I was building and handed over the plans. 10 minutes later I had all of the parts perfectly cut ready to go, along with the off cuts.
View attachment 133036
For assembly I purchased a box of MDF screws, wood glue and wood filler from a local branch of Toolstation. All screw holes were pre-drilled and countersunk. All edges were glued before screwing the panels together. Glueing may not have been necessary, however for the cost of a bottle of wood glue I felt it was worth doing.
View attachment 133037
Test fitting the top to make sure the door was going to fit as expected. The person manning the wood saw had cut the sides and back panel 10mm too long... this wasn't too much of an issue, it just meant I was going to have slightly large door gaps top and bottom than planned. I could have got a slightly longer door cut if I decided it didn't look right at the end of assembly.
View attachment 133038
All screw holes were then filled with wood filler. Once dry the filler was sanded back using 400 grit paper, leaving a lovely smooth finish.
View attachment 133039
View attachment 133040
I decided to give the whole cabinet several coats of MDF sealer (again purchased from Toolstation) to add a layer of protection against moisture. Once the MDF sealer was dry, it left a slight sheen to the surface.
View attachment 133041
At this point I made a slight deviation from the original plans. Knowing this was going to be a high tech tank, I knew I was going to be pushed for space inside the cabinet. Using some of the MDF off cuts, I decided to add a small shelf along the back panel. This was deep enough to be useful, but shallow enough not to be in the way.
View attachment 133042
Above you can see the cut out for the power cables through the rear panel, this was done using a hole saw.
Below you can see the cut out for the water hoses. To create this oval shaped cut out I drilled a hole top and bottom using a hole saw, then joined them together using a power file.
View attachment 133043
Next up was the MDF/Wood primer. This probably wasn't necessary, however I had some in the garage going spare so I gave it a good coating. I think it had two or three coats, sanding between each coat to get a glass smooth finish. I also trial fitted the door at this point.
View attachment 133045
The door was removed and finished off being primed. I then moved on to the final top coats of paint. I used the B&Q paint match service as I wanted to match the rest of our furniture. I opted to use their Valspar premium v700 paint, I think it was a satin or mid sheen finish. I have used this Valspar paint a lot and knew it would stand up to wear and tear.
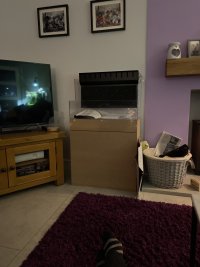
View attachment 133046
All finished and ready to go! (I forgot to put a mat under the tank for this final photo)
View attachment 133048
The only change I made was adding some adjustable feet. It was only after filling with water and the tank settling it became apparent that the floor under our carpet isn't level in the slightest.
I hope this is of use to other people thinking of creating their own cabinet.