• You are viewing the forum as a Guest, please login (you can use your Facebook, Twitter, Google or Microsoft account to login) or register using this link: Log in or Sign Up

Fluval flex DIY floodlight

pumpypants

New Member
Joined
22 Feb 2023
Messages
23
Location
Stockton on Tees
Ok so I'm not entirely happy with the built in factory 10w led.

So it got my creative juices flowing, I haven't seen a proper adaptation to the fluval flex hood that I would class acceptable.

So I thought why not fit a 30w led floodlight installed inside a black junction box ?
Cut the bottom off the box and cut a section out of the lid and silicone around if needed.

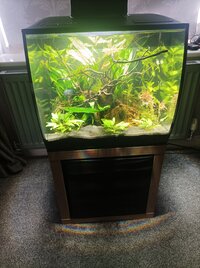
So this is how far I've got -
16791445277144252021514915451287.jpg
16791445983077666120636832991690.jpg
1679144665520268441525232709608.jpg

A couple of questions will this floodlight be too close to the water - possibly 3 and a bit inches ?

I have thought about heat and plan to install a 240v fan on top of the lamp with a vent on the top of the box

Oh and I know it's not exactly the best cut underneath but hey ho

Opinions thoughts more than welcome

Wife says it looks a bit industrial
 
Its a good idea and the planting/scape looks really good. If you don't use a fan you might not need a heater? Might be worth a try.
 
The last picture above is the stock light, I'm still toying with the idea to be honest.

A new hood is only £18 so if all goes pear shaped I've got something to fall back on.
 
Well I've gone ahead and done it and the flex is a LOT brighter

I used the top of the box screw holes as a template to mark the hood - drilled 4 holes and then used a jigsaw to cut from hole to hole.

There is a gap underneath the box due to the curve on the flex lid - however I have taped this up for the time being and may see about getting it plastic welded.

This is just mark one, thinking about it I may go for a larger rectangular box and fit 2x20w floodlights for better coverage.

Pardon the pun but the difference is night and day.

Compare this image to the one above.
Plenty of natural looking shimmer going on as well.
 

Attachments

  • 16792357680597036431710587687512.jpg
    16792357680597036431710587687512.jpg
    4.3 MB · Views: 99
As you say quite a difference. From the pictures I would say one light is probably enough.
BTW is that the larger flex tank? I have the 34l and the standard lighting seems brighter in mine!
 
Hi all,
Looks great.
This is just mark one, thinking about it I may go for a larger rectangular box and fit 2x20w floodlights for better coverage.
I think one is fine.
A new hood is only £18 so if all goes pear shaped I've got something to fall back on.
I'd be a little worried about how hot it gets.

cheers Darrel
 
To be honest I'm very very pleased with the outcome, everything is pearling (Taiwan moss especially) first time I've witnessed this.

Yes the one light is enough, I'm not too happy about the heat from the floodlight - the plan for this is to install a fan and fit a plastic vent on top of the box.

And the biggest surprise is one of my shrimp has eggs...


16793340596234442720920320155238.jpg
 

Attachments

  • Screenshot_2023-03-19-13-57-16-803_com.whatsapp.jpg
    Screenshot_2023-03-19-13-57-16-803_com.whatsapp.jpg
    745 KB · Views: 79
As you say quite a difference. From the pictures I would say one light is probably enough.
BTW is that the larger flex tank? I have the 34l and the standard lighting seems brighter in mine!
Yes it is the larger flex
I'll probably smarten up the intro post as I have this thread posted on Reddit and do a proper step by step - this when I have the fan and vent.

I was initially concerned about the light coverage but it covers the tank perfectly, with the stock light plants were rushing to the surface with this light I'm seeing a lot more horizontal growth.
 
I thought to myself that it would be a good idea to share a bit more detail about my DIY design.

To be fair I will post what I used and prices but not links - it's a sponsored forum to be fair.

I used a 30w led daylight floodlight (more on this below) from Amazon £10.50 I used a connector to wire an old figure of 8 lead with moulded plug.

I bought a fan well 2 actually as they were better value in a 2 pack £14 for 2 fans.

The enclosure measurements were probably a little tight - I would go a size up if I was doing it again - enclosure size 165 x 145 x 84 mm around £5

I have redone the tape surrounding with gaffer tape - still not happy with this result.

See below for quick descriptions of stages

I used the top of the junction box as a template to mark the hood, I then drilled 4 holes and then used a jigsaw to cut towards the holes and make a rough square cut out
IMG_20230326_110829.jpg


See above for the cut out job on the enclosure for the floodlight, I made a big enough access hole in rear to accommodate floodlight and fan wires

IMG_20230326_110914.jpg


Then I simply sat the fan above the light and positioned it above the cut out
IMG_20230326_111012.jpg


Final job I put the lid on and gaffer taped the sides - I have drilled some crude holes where the lid is going to be vented when the vent turns up.
IMG_20230326_112921.jpg


All in all It's been really easy to build as you can see - however as the floodlight is so close to the water I have had crazy growth including green hair algae so next time I would consider 20w rather than 30w

I'm onto the green hair algae by using spare hygrophilia polysperma as a floating plant - GHA is already on the turn and should be gone within a couple of days.
 
Back
Top