-
You are viewing the forum as a Guest, please login (you can use your Facebook, Twitter, Google or Microsoft account to login) or register using this link: Log in or Sign Up
You are using an out of date browser. It may not display this or other websites correctly.
You should upgrade or use an alternative browser.
You should upgrade or use an alternative browser.
2 tanks 1 sump
- Thread starter obsessed
- Start date

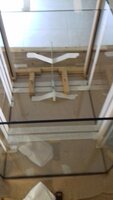
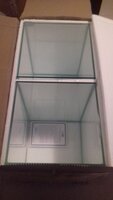
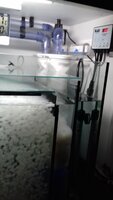
don't try and silicone when it's 27 degrees with no help.. I got there but felt rushed. the silicon starts to go off real quick anyhow I'm happy with the outcome.. it measures 42cm height 40cm width and 60 long. it's designed to house k1 micro media in the centre.. 3 chambers in total the other 2 simply a return for the pumps and lastly a chamber at the other end for the overflows combined to use with 2 socks 1 for each overflow.there's also 2 small bubble traps at the end of the center chamber that are 5 cm in width. I will go into more details about the sump later when I go through the whole setup.. like I said this was the first thing I made but already sized up and drew the plans for the furniture. up next
Attachments
Edvet
Member
Make sure you have plenty room to accept the flowout in case of powerfailures and plenty to start up when the power is back on.
thankyou for the good advise.. more will be revealed as I go on.. I feel it's been such a long journey but very enjoyable. I've had tropical style tanks in the past.. so i understand the basics.. but yeah first sump so i done plenty of research as my tanks are not drilled.. no spillage allowed... ") I've left plenty of room.. it has to allow for 2 tanks to drain into if I have a power cut
I've left plenty of room.. it has to allow for 2 tanks to drain into if I have a power cut  i get around 30 liters syphon back from both tanks.. also I cannot let the k1 micro go into any other chamber etheir.. it would be a nightmare..
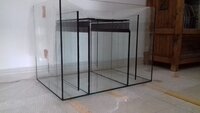
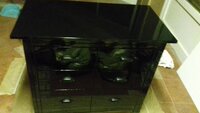
I've left plenty of room.. it has to allow for 2 tanks to drain into if I have a power cut ok.. the furniture.. tank and sump stand.. obviously worked around sump size.. I also had 6 handles left over from another build i wanted to incorperate into the design. I decided at this point I want a 90x45x45 tank iwagumi style. the cabinet is made out of furniture grade pine.. very basic.. 2 sides top bottom and 2 doors with removable back. I wanted something special for this tank.. shiny black was something I had not done as a finish on pine. 100x50x74. 16 coats of magic and 2 weeks later I had shiney black stand.. meanwhile I definitely wanted to put together a iwagumi style tank but at the same time I love plants in general and there's allot to choose.. 2 tanks it is.. 2 45cm cubes would fit nice but 2 tanks on my first planded tank build. umm.. I orderd my tanks 45x45x60.. yes 60cm deep.. not enough negative space in allot of scapes which throws the scale off a tad..in my eyes.. anyway on and forward it went
Attachments
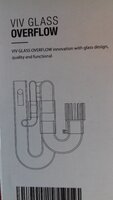
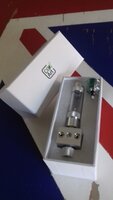
the list is long but 2 big things ticked off that long list. nearly 3.. I was waiting for the tanks to be made and i brought 2 viv glass overflows to get the water into the sump.. the tanks are not drilled as I not want anything in the tank at all.. weirs and of a like..
Attachments
Last edited:
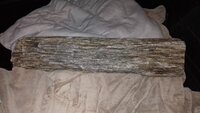
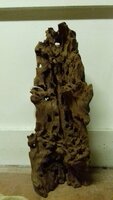
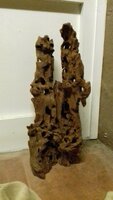
1 iwaguni and 1 freestyle mystyle with some manzanita wood is the plan. the stone was not an easy choice.. so many and expensive. brought a lovely piece of bog wood of the Internet at the risk it being wrong.. but he was very helpful and it was all good.. back to the stone.. I was decided on glitter rock.. it was actually wood at 1 point.. I could not get a piece 45cm tall or the correct thickness.. in fact I could only buy it off the internet as there's no lfs that deal with planted tanks. 1 month later after loads of looking in garden centers low and behold a 50 kilo piece.. it was a complete trunk sliced down into 110cm chunks. I had my work cut out.. literally
Attachments
Last edited:
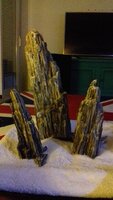

it's like having the box set..
next on the list was the lights..
lots on the market but wanted a bit of control and did not want to mount them on the tank rim.. first option was to hang the lights.. 2nd was to diy a hidden bracket behind the tanks and fasten it to the wall. here's the tanks on the stand with led arm attached to the diy bracket idea.. works perfect with the ai prime led fw arms..
next on the list was the lights..
lots on the market but wanted a bit of control and did not want to mount them on the tank rim.. first option was to hang the lights.. 2nd was to diy a hidden bracket behind the tanks and fasten it to the wall. here's the tanks on the stand with led arm attached to the diy bracket idea..
Attachments

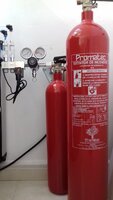
getting the co2 into the tank was going to be with a reactor..
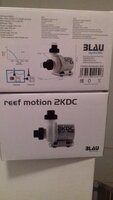
I thought the sera 500 would do it with its own dedicated 1000 lph pump but no.. it quickly filled with co2 at around 10 bps and was nowhere near what was needed.. the outflow of the reactor was sitting in front of the pumps in the sump flowing out of a barbed T piece. I purchased the 1000 unit thinking this was it with a dedicated 1000lph pump it just took a little longer to fill with co2 at the same rate. by this time I had hard plumed the sump and fitted everythIng to do a the wet run properly.. filled the sump and tanks.. it holds around 260 ltr in total.. 1 sera 1000 wasn't going to work.. I tested and tested I could not get the desired ph drop. another 1000 reactor and jebeo 1000lph pump was added to the now full pump chamber.. with another bubble counter 1 for each tank.. the outflow from each reactor now sits in front of its own sump pump with an L piece now im at a decent ppm of co2 and can even go yellow and get 2.0 ph drop with around 8 to10 bps from eaah bc..I filled the fluidized bed with 10ltr of k1 micro media which took alot of time to get it fluidize properly without floating.. another 1200 lph pump to push the media around.. the k1 needs to be seeded really then it gets covered with bio film and bacteria which in tern makes it more boyent. i will add more to get to around 20 ltr eventually.. i also added the 3 liters of siporax bio media to the sump and seeded the tank with the free bottle of bacteria you get with it. now ready for the plant order.. plant list and some specs up soon


I thought the sera 500 would do it with its own dedicated 1000 lph pump but no.. it quickly filled with co2 at around 10 bps and was nowhere near what was needed.. the outflow of the reactor was sitting in front of the pumps in the sump flowing out of a barbed T piece. I purchased the 1000 unit thinking this was it with a dedicated 1000lph pump it just took a little longer to fill with co2 at the same rate. by this time I had hard plumed the sump and fitted everythIng to do a the wet run properly.. filled the sump and tanks.. it holds around 260 ltr in total.. 1 sera 1000 wasn't going to work.. I tested and tested I could not get the desired ph drop. another 1000 reactor and jebeo 1000lph pump was added to the now full pump chamber.. with another bubble counter 1 for each tank.. the outflow from each reactor now sits in front of its own sump pump with an L piece now im at a decent ppm of co2 and can even go yellow and get 2.0 ph drop with around 8 to10 bps from eaah bc..I filled the fluidized bed with 10ltr of k1 micro media which took alot of time to get it fluidize properly without floating.. another 1200 lph pump to push the media around.. the k1 needs to be seeded really then it gets covered with bio film and bacteria which in tern makes it more boyent. i will add more to get to around 20 ltr eventually.. i also added the 3 liters of siporax bio media to the sump and seeded the tank with the free bottle of bacteria you get with it. now ready for the plant order.. plant list and some specs up soon
Attachments
Last edited:
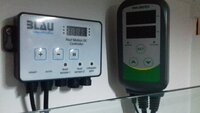
1 last thing for a while.. I think the inner workings of the system is just as important and for me has to look as good as the display it's holding together.. clean tidy and functioning on a level where I don't have to fix or change things all the time.. just to add I have had many filter brands and types over the years and dislike the inconsistentsy of the leaks and other matinance problems.. it's probably a bit of my doing as I could not resist and always had to have 2 canisters filters the same brand and type for to 1 tank.. good flow and a tad less matinance and if 1 failed blah blah you now the rest
Last edited:
now with the flooded tanks and sump cycling i ordered the lights 2 x aqua illumination prime 55w hd.. plants and 3 bags of amazonia soil..
Plant list
Iwagumi tank
8 x hc cuba
2 x bucephalandra lamandau purple
freestyle tank
3 x montevidensis
2 x reineckii rosaefolia
2 x 1 2 grow reineckii mini
2 x micranthemum umbrosum
2 x 1 2 grow pogo erectus
2 x pogo helferi
2 x eleocharis parvula
1 x 1 2 grow marsilea crenata
2 x hydrocotyle tripartita
2 x rotala boschi ( boschii)
1 x 1 2 rotala bonsai (Armenia)
2 x lobelia cardinalis red
2 x cryptocoryne wendii brown
2 x cryptocoryne beckettii petchii
For the wood trunk
Fissidens Fontanus ss grid
anubias bonsai
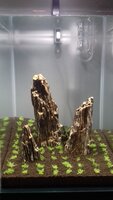
the leds pucks arrived and fitted... plants and soil came soon after.. I emptied and dried the tanks but left the sump running.. I approached the iwagumi first I thought this would be the safe choice.. pretty straight forward in practice as the stone was already in place.. a few hours later...
Plant list
Iwagumi tank
8 x hc cuba
2 x bucephalandra lamandau purple
freestyle tank
3 x montevidensis
2 x reineckii rosaefolia
2 x 1 2 grow reineckii mini
2 x micranthemum umbrosum
2 x 1 2 grow pogo erectus
2 x pogo helferi
2 x eleocharis parvula
1 x 1 2 grow marsilea crenata
2 x hydrocotyle tripartita
2 x rotala boschi ( boschii)
1 x 1 2 rotala bonsai (Armenia)
2 x lobelia cardinalis red
2 x cryptocoryne wendii brown
2 x cryptocoryne beckettii petchii
For the wood trunk
Fissidens Fontanus ss grid
anubias bonsai
the leds pucks arrived and fitted... plants and soil came soon after.. I emptied and dried the tanks but left the sump running.. I approached the iwagumi first I thought this would be the safe choice.. pretty straight forward in practice as the stone was already in place.. a few hours later...
Attachments
round 2.. I kind of new it was going to be a long night.. I started the second tank straight after.. I'd already made a rough plan of the layout.. i don't want to insult the Dutch style aquascapers by saying mine is dutch but that's my inspiration.. all planted and then a slow flood.. that was Jan 12th


2 week later
hc was a bit slow..the 2 buce purples were wedge in between the main stone and soil which I was not overly convinced they would take but produced a few new shoots.. you can just about see them in the photo which i will add are taken poorly from my phone.. the dutch wood tank had taken off... the normal melt with the crypts was starting... added 10 blue velvet in the iwagumi and 10 red sakura fire shrimp in the other tank.. I feel there's a theme coming on..


hc was a bit slow..the 2 buce purples were wedge in between the main stone and soil which I was not overly convinced they would take but produced a few new shoots.. you can just about see them in the photo which i will add are taken poorly from my phone.. the dutch wood tank had taken off... the normal melt with the crypts was starting... added 10 blue velvet in the iwagumi and 10 red sakura fire shrimp in the other tank.. I feel there's a theme coming on..
