
Alexander Belchenko
Member
Hi there, it's continuation of my thread http://www.ukaps.org/forum/threads/aqua-at-pet-shop-layout-no-3-the-end.32339/ so I think we can call it "season 2". The same pet shop, the same tank, the same equipment, different layouts. I hope you will like it.
Contents:
Layout #4
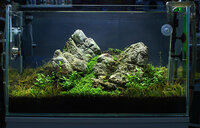
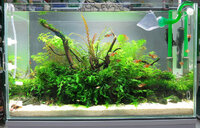
2 months (IAPLC calling)
 60x30x36 - 2 months by Alexander, on Flickr
Contents:
Layout #4
- Working on hardscape for layout #4
- 2015/09/13 - dry start - 1st week
- Dry start chronicles - first 6 weeks
- 2015/10/17 - Wet start
- 2015/10/25 - 1st week with water
- 2015/11/14 - 4 weeks - layout is cancelled
- Preview - 1.5 weeks old
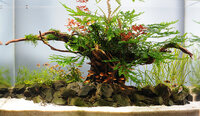
- 1.5 months - the oak tree is growing
- Maintenance mode
- 2016/01/31 - 2 months milestone.
- Atomizer UP Aqua D-531
- 2016/02/14 - 2.5 months
- 2016/03/06 - 3 months
- Starting layout #6
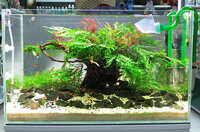
- (About) 1.5 months update
- ~2 months update
- IAPLC 2016 result
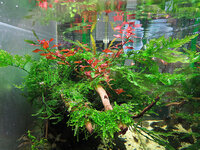
- 4 months update (August 2016)
- September 2016 update - about 5.5 months
- 60x30x36 - optiwhite
- DIY light with 2*36W PL-C light bulbs, I like combination of OSRAM bulbs 840+880. Light period is usually 7-8 hours on timer.
- Tetra EX 600 external canister filter (roughly measured flow ~400LPH)
- CO2 injection 24/7 to get pH~6.5-7.0, sometimes using air pump when light went off
- Liquid fertilizers, Ro+tap water to get KH~3-4, remineralize to increase GH up to 8-10.
2 months (IAPLC calling)
Attachments
-
 21687707344_0062e14100.jpg75.5 KB · Views: 513
 -
 23829248334_1818bc6f4d.jpg155.2 KB · Views: 393
 -
 24104033694_78840c0068.jpg94.9 KB · Views: 239
 -
 24638719151_4016c22cca.jpg121.5 KB · Views: 246
 -
 26988652721_049b158eff_z.jpg240.5 KB · Views: 213
 -
 26988652721_049b158eff_z.jpg240.5 KB · Views: 96
 -
 26988652721_049b158eff_z.jpg240.5 KB · Views: 118
Last edited:


